
Every March 2nd Dr. Seuss’ birthday is celebrated throughout schools in the US. Some schools do Read Across America, or a week of Dr. Seuss related activities like pajama day, making green eggs and ham, or wearing funny hats.
In my classroom, I dedicate an entire month-long unit to celebrating my favorite author, Dr. Seuss. He is the most creative man of this time, and putting very real topics, like accepting differences or environmental issues, into stories for children (and adults) to read over and over is timeless and priceless. Especially in this day and age, where so much stress is put on children to excel in 3298473298 or more aspects of life, delving into a Dr. Seuss book just gives everyone all the positive feels that you need to help change the world.
This post is dedicated to my amazing students, who not only share my love of Dr. Seuss, but also continue to teach me that hands on activities that connect literacy, learning, and application, are the most meaningful and enjoyable.
I have a few favorite activities on my teacher Dr. Seuss Pinterest board and personal Dr. Seuss Pinterest board, and here are some that I am doing in my classroom. You may do these as a teacher, or as a parent. If you have any questions or comments, feel free to contact me!
Bartholemew and the Oobleck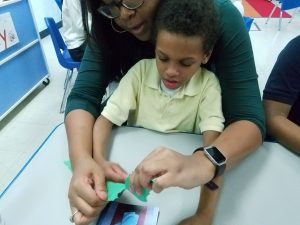
This is a great story to teach kids about weather, the changing of the seasons, as well as the power of saying the words “I am wrong, and I am sorry.” For my students, we used this story as a short discussion on weather, with an emphasis on identifying weather that comes from the sky – rain and snow. It was perfect timing for the snow days we had too!
One activity I did was having the students rip pieces of green construction paper to put it on a printout of themselves. This reinforced self awareness, as well as body part identification and fine motor skills. Ripping paper is not only fun for kids to do, but also great for pincer grasp development. I had each student identify a picture of themselves, take it to their seat, and rip paper into small pieces and glue them onto the picture.
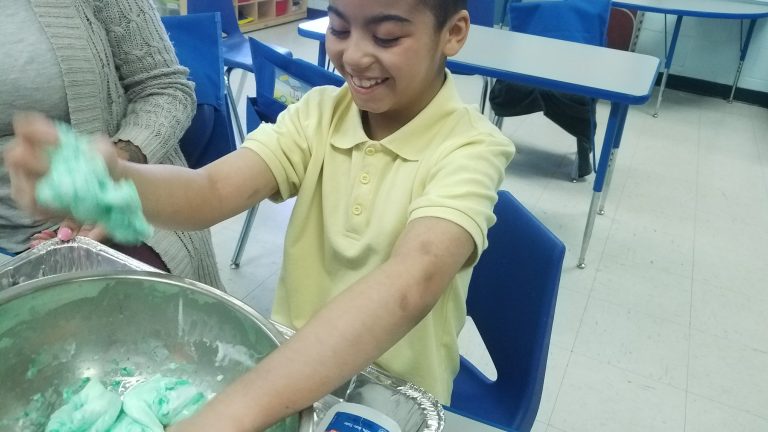
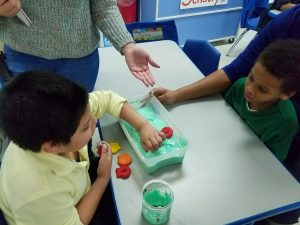 My Occupational Therapist, who is absolutely amazing, sent me the recipe to make Oobleck (below). My kids had a blast, to put it lightly. After making the Oobleck, I am using it in my centers to reinforce letter identification. We hide letters (manipulatives) in the Oobleck and let the kids find them. This reinforces letter ID, and it gives them some great sensory fun! Even during ‘down time’ or when my students need to calm down, they ask for Oobleck, which just shows how much fun just a little goo can get you.
White Glue (4 oz or larger) (elmers or any other liquid white glue)
1 bottle Liquid Starch 64 fl. Oz.
Bowl
Measuring cup
Large Spoon (to stir)
Optional items: food coloring (we used green), essential oils (I am a huge fan of lavender, especially since this can be used as a tool to help students calm down)
Steps:
1. Pour entire bottle of glue into bowl
2. Fill empty bottle of glue with warm water
3. Empty bottle with warm water and add to glue in bowl
4. Mix water and glue until combined thoroughly
5. Add food coloring to glue water mixture and mix thoroughly
6. Fill glue bottle with liquid starch and add to bowl
7. Stir mixture until slime begins to come together
8. Once slime comes together, knead slime until it is no longer sticky
Skills from activity: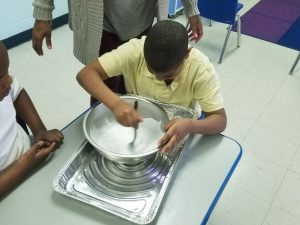
Grasp strength: holding spoon to stir, squeezing glue bottle, kneading slime.
Bilateral hand skills: holding bowl while stirring, opening/closing glue bottle.
Fine motor skills: combination of grasp, wrist and arm movements will help develop fine motor skills.
Sensory processing skills: tactile (even if child has difficulty touching slime, the child is still being exposed to it and will still benefit from exposure).
All the above skills help to develop the muscles in a child’s hand to increase strength which will benefit them in their ability to hold a writing implement with increased control. An added bonus is that it is also a sensory activity which will help children with tactile processing issues.
The Tooth Book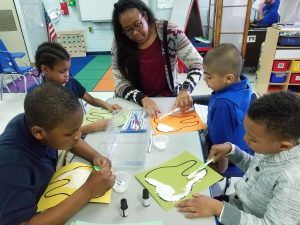
This story was used to reinforce skills that are also connected with my video modeling study. Through the utilization of our new GoPros, I have been able to take videos of my students brushing their teeth. They absolutely love watching videos of themselves, and this activity was a great connection to 1. infuse techniques of teeth brushing in a fun art activity and 2. reinforce the importance of keeping our teeth clean.
Materials: large bowl of water, small cups of white paint, toothbrushes, a printout of a large tooth (it can be on regular paper, I just prefer it on colored cardstock), peppermint or clove essential oil (optional).
What I did was print out a large tooth on cardstock paper – I used the colors yellow, green, and orange. Using old toothbrushes, I put a large bin of water in the middle of the table for students to ‘clean’ and wet their toothbrush. In small bowls, I mixed white paint and peppermint or clove oil – I let the students smell and add the essential oils and stir the paint mix. After the paint was mixed, I asked the students to brush their tooth and make it clean.
I Wish I had Duck Feet!
I enjoyed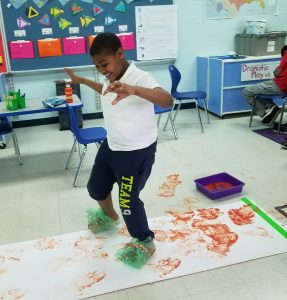 reading this story to my students, because it is always fun to do a silly read aloud. I am pretty animated, so a story about having animal feet, tails, and spouts is just plain funny. I wanted my students to identify their feet, so using this book was a great way to just reinforce their ability to answer me when I ask, “Where are your feet?”
Materials: I Wish I had Duck Feet book, duct tape (bright/funky colors optional), long fadeless paper, bubble wrap, or some kind of reusable packaging (I had these square air pockets), a rectangular shape container, and orange paint.
Put the orange paint into the rectangular shaped container, and have the students take their shoes and socks off, and roll up their pants (lots of fine motor and functional skill practice right there). Have them sit in a chair, and you will wrap the bubble wrap around their feet, securing it with a piece of duct tape. Have them walk to the fadeless paper, step one foot at a time into the rectangular container, and let them walk on the fadeless paper. The prints really come out looking like duck feet!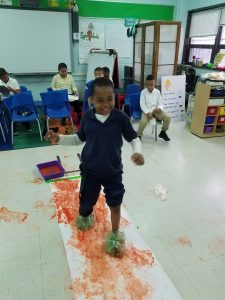
Some of my kids were able to take their shoes off and on independently, others needed help. Some of them walked to and from the start and finish line, some only did one round. As long as they tried, I was happy. This was a super fun lesson, and I used materials that I just happened to have in my classroom already!
It is very important to me to model the 5 R’s in my classroom in any lesson I do. Other coworkers know that I like to save things, so they have started coming to me to ask “Is this recyclable?” which I love, and also “Do you think you can use this for anything?” My answer is usually yes, to either or both of those questions, and bubble packaging is one of my favorite things to save. You really never know when it will be the next best lesson material.
Ten Apples up on Top!
 What better way to teach kids than by using real materials? Ten Apples up on Top is a fun book to teach simple number comprehension, and I had my kids use real apples to get a visual as to what the amounts of different numbers look like. I have said this before, all my kids are different, so their number goals were individualized.
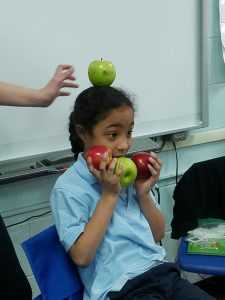
My objective was for students to count, write, match and/or identify numbers 1-10. Using real apples, I had the students see how many we could balance on our heads. They laughed so hard when my 2nd apple fell off my head! We also learned how difficult it was to balance something on our heads (which is also practicing some core strengthening skills) and found that we could really only successfully do ‘just one’ apple on our heads. After reading the story “Ten Apples up on Top” I had students take turns trying to balance apples on their heads. I created an easy activity sheet, and cut up my apples in half (I personally like cutting them horizontally so I get the star in the middle). Then they used the apple to stamp, apple pictures onto their head ( students could draw themselves, but mine have difficulty so I used picture printouts). They wrote how many apples they have on top, and after we were done with our apples, we composted them!
Materials:
- Apples (4)
- knife
- red/green paint
- plate
- pre printed activity sheet
- red dot paint
- glue
The Lorax
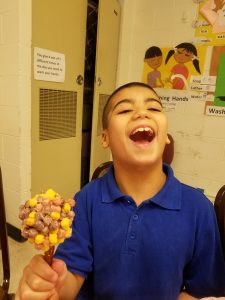
I love this book – so much, that it is a critical part of my Environment Unit that I do every year. Those activities will be in different posts, but one thing I did to introduce the story of the Lorax with my students is by making our own edible Truffula Trees! I found the recipe here, and made my own little tweaks to it (instead of using craft sticks, which would be pretty wasteful, I used pretzel sticks to make the whole tree edible).
 The Lorax book, although absolutely amazing, is a little long to read the entire thing in one sitting, especially to kids with special needs. So I paraphrased some pages, acted dramatically at the right parts, and stuck with the theme, which was “The Lorax kept telling the Once-ler ‘STOP I speak for the trees, and I do not want you to cut any more down please’ and the Once-ler kept making a lot of pollution.” They stayed engaged, especially because they were motivated by the truffula cereal (Trix) sitting next to me haha!
My objective for this lesson was for the students to make an edible truffula tree and identify the actions pour, stir, and/or identify the recipe items needed. All of my kids are different, so some were just identifying the ingredients, while others were identifying the ingredients and the actions we were doing (Ex: “I am stirring” etc.). Again, I will be doing more Lorax posts more centered around the theme of the story, but this lesson was just to introduce the story and get them excited to learn about saving the trees (since we will be doing that the rest of the school year!)
Materials: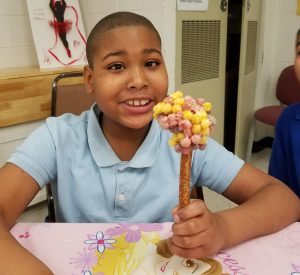
- Trix cereal
- marshmallows
- butter
- pretzel sticks
- The Lorax book
Basically, all you are doing is making rice krispies treats, but with Trix cereal. Have the students roll the cereal into a circle around the pretzel when the mix is done, so they are practicing fine motor control and whole-hand dexterity when shaping the truffula tree around the pretzel. This part was especially hard for them to complete, because the ‘cupping’ of your hands to make the sticky (sensory play) truffula tree tufts stay on the pretzel takes patience and control.